Many people have trouble with the size of their Temporary Dimension size being extremely small. In the last "build" (or service pack as they are now referring to them) for Revit, it noted that you can now change the size of the temporary dimensions in the reivt.ini file.
Check out the Autodesk support solution - ID: TS1074426 at http://usa.autodesk.com/adsk/servlet/ps/item?siteID=123112&id=10024530&linkID=9243099 for instructions on how to add the Graphics information to your revit.ini file.
This works great...even for presenting Revit to a group. Take a look at the image below...just doubling the default value (8 to 16) makes a big difference.
One thing to note...you have to install the latest build of Revit before this will work.
Sunday, October 28, 2007
Saturday, October 27, 2007
Sheet Index Organization
Ever wonder how to get your sheets to be organized the way YOU want them and not simply in alpha-numeric order?? Well, below is an example of how you can accomplish this very thing.
You can accomplish this by adding parameters to your sheets. These parameters should ideally be added to the template file so they are always available to new projects. They can also be added to existing projects to update them to have this organization. The other method is to use/create shared parameters, but it is not necessary since these parameters will not be used in tags. The exact wording of the parameters is not necessary; these are only given as examples. You can create the names of the parameters how-ever you feel.
Start off by going to Settings->Project Parameters.
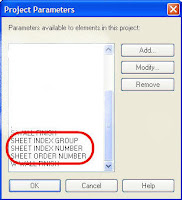
Click on the Add… button and at a minimum, you will need to add the SHEET INDEX GROUP and SHEET INDEX NUMBER parameters.
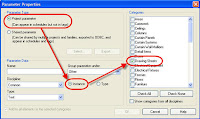
Select Project parameter, then make sure Instance is selected. Then select Drawing Sheets from the Categories list…this will add the parameters to the properties of the sheets. Type in the name of the parameter and make sure the type is set to Text. The “Group parameter under:” is up to you. Follow this process for all the parameters you are going to add for the drawing list organization.
Once you have all the parameters added, you will then see these parameters when you look at the Instance Parameters of your drawing sheets. (Figure 1)
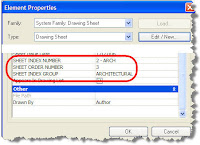
Figure 1
The reason for the Sheet Index Number being 2 – Arch is for the Sheet Index order (see Figure 2). In this example, the values used were…
1 – Gen
2 – Arch
3 – Int
4 – Plumb
5 – Mech
6 – Elec
If you wanted to add Civil, all you need to do is give it the order number (say 1), then re-number the rest.
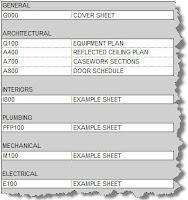
Figure 2
In order to get the above, you will make the Drawing List schedule with the following properties.
SHEET ORDER NUMBER is only needed if you want full control of the order of the sheets in the index. This parameter will allow you to completely control the order of your sheets per Group instead of them being in alpha-numeric order.
You can then make the SHEET INDEX NUMBER, SHEET ORDER NUMBER and SHEET INDEX GROUP hidden fields in the schedule since you don’t need to see them on your sheet. I would however duplicate this schedule and keep these 3 parameters visible for ease of change and applying the values.
Thursday, October 25, 2007
My First Blog Posting!!
Hello Everyone...
First off thank you for navigating to my Revit Architecture blog. I plan on posting tips and tricks, issues to watch out for, updates, etc. Hopefully you will find the information I post helpful/useful and I will try to keep it updated as much as possible.
Subscribe to:
Posts (Atom)