You can accomplish this by adding parameters to your sheets. These parameters should ideally be added to the template file so they are always available to new projects. They can also be added to existing projects to update them to have this organization. The other method is to use/create shared parameters, but it is not necessary since these parameters will not be used in tags. The exact wording of the parameters is not necessary; these are only given as examples. You can create the names of the parameters how-ever you feel.
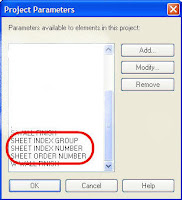
Start off by going to Settings->Project Parameters.

Click on the Add… button and at a minimum, you will need to add the SHEET INDEX GROUP and SHEET INDEX NUMBER parameters.

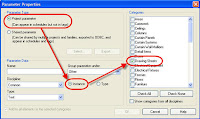
Select Project parameter, then make sure Instance is selected. Then select Drawing Sheets from the Categories list…this will add the parameters to the properties of the sheets. Type in the name of the parameter and make sure the type is set to Text. The “Group parameter under:” is up to you. Follow this process for all the parameters you are going to add for the drawing list organization.
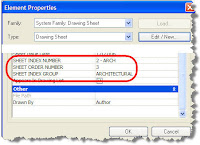
Once you have all the parameters added, you will then see these parameters when you look at the Instance Parameters of your drawing sheets. (Figure 1)

Figure 1
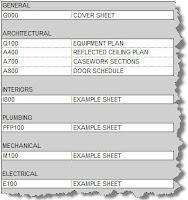
The reason for the Sheet Index Number being 2 – Arch is for the Sheet Index order (see Figure 2). In this example, the values used were…
1 – Gen
2 – Arch
3 – Int
4 – Plumb
5 – Mech
6 – Elec
If you wanted to add Civil, all you need to do is give it the order number (say 1), then re-number the rest.

Figure 2
In order to get the above, you will make the Drawing List schedule with the following properties.
SHEET ORDER NUMBER is only needed if you want full control of the order of the sheets in the index. This parameter will allow you to completely control the order of your sheets per Group instead of them being in alpha-numeric order.
You can then make the SHEET INDEX NUMBER, SHEET ORDER NUMBER and SHEET INDEX GROUP hidden fields in the schedule since you don’t need to see them on your sheet. I would however duplicate this schedule and keep these 3 parameters visible for ease of change and applying the values.
You can then make the SHEET INDEX NUMBER, SHEET ORDER NUMBER and SHEET INDEX GROUP hidden fields in the schedule since you don’t need to see them on your sheet. I would however duplicate this schedule and keep these 3 parameters visible for ease of change and applying the values.

4 comments:
Great tip!
Is there a way to plot the sheets in the same order as the drawing list?
Thanks!
Unfortunately Revit itself will not plot according to the sheet list. What you'll want to do is check out the Batch Plot Utility in the Subscription Center. This will allow you to organize the plotting order the way you want.
This way such a huge help! Thanks so very much!!!
nice tip. this is exactly what i needed!
Post a Comment