Showing posts with label Sheet. Show all posts

Friday, December 12, 2008

Change Image in Revit Title Block

There's been some discussion on AUGI on tying a Parameter to an Image so things like stamps can be changed in the title block.  This can be done, except that you have to insert an image into a family...generic annotation family is a nice one to use.

I would like to give credit to Aaron Bergmann for pointing out this can be done in this AUGI post.  Thanks Aaron!!

Here's the steps you'll need to use to make this happen...

  • Start a new Family and use the Generic Annotation.rte
  • Insert an image into the Generic Annotation family.
  • Go to Settings->Family Category and Parameters.
  • Check the box for Shared in the bottom pane.

image

  • Save it with an appropriate name and load it into your Title Block family.
  • Use the Symbol Tool to insert the new Image Family. 
    • !!NOTE!! You may not see the image when you initially bring it in.  Place it near where you want it, then move or align it.  There should be a dot for the insertion point of the family when you go to move or align.

image

  • With the image family selected, go to Element Properties.

image

  • When in Element Properties, select the gray box for Visible.  Add a new parameter to control the Visibility of the image family.  Give the parameter name something similar to the image you want to control.  Don't call them Image 1, Image 2, etc.  I also made mine Type based so I can change the visibility across the board instead of each individual title block.
  • If you have multiple images that you would like to turn on/off, repeat the same process for each image family.
  • Once the image families have been set with a Visibility Parameter, go to Family Types.  Uncheck what you do not want to see and check what you want to have on by default.  If you want a blank space, leave them all unchecked.
    • !!NOTE!!  The images will not change visibility in the Family Editor.  Testing whether or not you've attached the correct parameter to the correct family will have to be done in a project.
  • Save the Title Block family and Load it into your project.
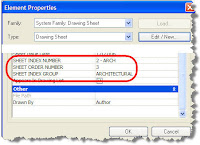
  • Once the title block family is loaded in the project, all you have to do is select one of the title blocks and go to Element Properties.  Go to Edit/New to access the Type Parameters and check and uncheck away.

image

Extra little tip...controlling the size of the image.  Since the image has to be adjusted in the generic annotation family, measure the distances (area) in the title block that you want the image to fit into.  You can then either re-create this area in the annotation family or, copy-clip and paste the lines that make up the area for the image into the annotation family.  Just remember to remove the lines when you're done sizing the image. :)

And...if you want to use formulas to help aid in not having more than one image on at a time, here's something I did for this example.  If you have two checks in the top parameters, no logo will be displayed.  The lower parameters (under Other) are the actual Parameters tied to the Families.  The Parameters under Graphics are ones I created in the Family Types to drive the others.

image

Thursday, December 6, 2007

Sheet Index Organization for Browser Sheet Organization

As I have previously posted, you can setup new parameters to to organize your sheet index but you may not be aware you can also use those parameters to organize your sheets in the Project Browser.

First, go to the Project Browser and right-click on Sheets and then Properties. What you'll need to do next is select a type other than All since you can not duplicate the All type. Hit Duplicate and rename it to whatever you want. Then, hit the Edit button for Folders and set the organization as in the image below...

Once you have the organization set, your browser will be organized in the same manner as your Sheet Index list. The only thing that won't happen for the organization is the order of the sheets in the browser...they will still be in alpha-numerical order instead of using the Sheet Order Number like the Sheet Index does.

Saturday, October 27, 2007

Sheet Index Organization

Ever wonder how to get your sheets to be organized the way YOU want them and not simply in alpha-numeric order?? Well, below is an example of how you can accomplish this very thing.

You can accomplish this by adding parameters to your sheets. These parameters should ideally be added to the template file so they are always available to new projects. They can also be added to existing projects to update them to have this organization. The other method is to use/create shared parameters, but it is not necessary since these parameters will not be used in tags. The exact wording of the parameters is not necessary; these are only given as examples. You can create the names of the parameters how-ever you feel.

Start off by going to Settings->Project Parameters.

Click on the Add… button and at a minimum, you will need to add the SHEET INDEX GROUP and SHEET INDEX NUMBER parameters.


Select Project parameter, then make sure Instance is selected. Then select Drawing Sheets from the Categories list…this will add the parameters to the properties of the sheets. Type in the name of the parameter and make sure the type is set to Text. The “Group parameter under:” is up to you. Follow this process for all the parameters you are going to add for the drawing list organization.

Once you have all the parameters added, you will then see these parameters when you look at the Instance Parameters of your drawing sheets. (Figure 1)

Figure 1

The reason for the Sheet Index Number being 2 – Arch is for the Sheet Index order (see Figure 2). In this example, the values used were…
1 – Gen
2 – Arch
3 – Int
4 – Plumb
5 – Mech
6 – Elec
If you wanted to add Civil, all you need to do is give it the order number (say 1), then re-number the rest.


Figure 2

In order to get the above, you will make the Drawing List schedule with the following properties.


SHEET ORDER NUMBER is only needed if you want full control of the order of the sheets in the index. This parameter will allow you to completely control the order of your sheets per Group instead of them being in alpha-numeric order.

You can then make the SHEET INDEX NUMBER, SHEET ORDER NUMBER and SHEET INDEX GROUP hidden fields in the schedule since you don’t need to see them on your sheet. I would however duplicate this schedule and keep these 3 parameters visible for ease of change and applying the values.