Tuesday, March 22, 2011

Revit Architecture 2012 New Features

Instead of just replicating the new features here, I’ll post a link to a great post by David Light over at his Revit Blog.  David did a GREAT job at covering the new features with some commentary….well done David!!

If you just want a quick list of the new features, here you go…

  • Revit Server (Now Native inside Revit)
  • Citrix Ready Release (Cloud based Revit??)
  • Autodesk Vault Collaboration AEC
  • Linking Improvements (Tag Rooms, Keynote, etc.)
  • Worksharing Enhancements
  • Improved DWG export fidelity
  • Visualisation Enhancements
  • 3d Tagging (Annotate a 3D View)
  • Modelling Enhancements
  • Performance
  • Construction Modelling
  • Massing enhancements
  • Materials
  • Point Cloud Support
  • IFC

As time goes on, I’ll be posting more about the new features as well.   

System Requirements for Revit 2012 Products

That time of year for new Autodesk products.  Below are the updated system requirements for the Revit family of products for 2012…

32-bit Systems

  • Microsoft® Windows® 7 32-bit Enterprise, Ultimate, Professional, or Home Premium edition, Microsoft® Windows Vista® 32-bit (SP2 or later) Enterprise, Ultimate, Business, or Home Premium edition, or Microsoft® Windows® XP (SP2 or later) Professional or Home edition*
  • For Microsoft Windows 7 32-bit or Microsoft Windows Vista 32-bit: Intel® Pentium® 4 or AMD Athlon™ dual core processor, 3.0 GHz (or higher) with SSE2 technology 
  • For Microsoft Windows XP: Intel Pentium 4 or AMD Athlon dual core, 1.6 GHz (or higher) with SSE2 technology
  • 4 GB RAM
  • 5 GB free disk space
  • 1,280 x 1,024 monitor with true color
  • Display adapter capable of 24-bit color for basic graphics, 256 MB DirectX® 10-capable graphics card with Shader Model 3 for advanced graphics (find out more about recommended graphics hardware)
  • Microsoft® Internet Explorer® 7.0 (or later)
  • Microsoft Mouse-compliant pointing device
  • Download or installation from DVD9
  • Internet connectivity for license registration

64-bit Systems

  • Microsoft Windows 7 64-bit Enterprise, Ultimate, Professional, or Home Premium edition, Microsoft Windows Vista 64-bit (SP2 or later) Enterprise, Ultimate, Business, or Home Premium edition, or Microsoft® Windows® XP Professional x64 edition (SP2 or later)*
  • For Windows 7 64-bit or Windows Vista 64-bit: Intel® Core™ i5-2300 quad-core processor (2.8 GHz, 6 MB cache) or equivalent AMD® processor.
  • For Windows XP Professional x64: Intel Pentium 4 or AMD Athlon dual core, 1.6 GHz (or higher) with SSE2 technology
  • 8 GB RAM
  • 5 GB free disk space
  • 1,680 x 1,050 monitor with true color
  • Display adapter capable of 24-bit color for basic graphics; 256 MB DirectX 10-capable graphics card with Shader Model 3 for advanced graphics (find out more about recommended graphics hardware)
  • Microsoft Internet Explorer 7.0 (or later)
  • Microsoft Mouse-compliant pointing device
  • Download or installation from DVD9
  • Internet connectivity for license registration

Looking for the (Performance) RECOMMENDATIONS and not the Requirements, take a look at these specs…

  • Microsoft Windows 7 64-bit Enterprise, Ultimate, Professional, or Home Premium edition
  • Intel® Core™ i7-2600 quad-core processor (3.8 GHz, 8 MB cache ) or equivalent AMD processor
  • 16 GB RAM (or more)
  • 1,980 x 1,200 monitor with true color
  • 2 GB (or more) DirectX 10-capable graphics card with Shader Model 3 (find out more about recommended graphics hardware)

Wednesday, February 23, 2011

Disallow Join vs Don’t Clean Join

Ever wonder what the difference was between these two, or even know that there was a difference between these two options?  Both are part of the Wall Joins tool and are selected by different methods. 

The Disallow Join option is selected when you pick the end of a wall with the Wall Joins tool when it’s not connected with another wall, or now in 2011, when you right-click on the drag grip of a wall and select Disallow Join.

image     OR     image

The Don’t Clean Join option is available when you are trying to manipulate a wall join.

image

Now for the difference…and we’ll work with the 2 walls at the intersection. 

If you use the Disallow Join, you’ll get this result…

image

And if you use Don’t Clean Join, you’ll get this result…

image

As you can see, Disallow Join doesn’t allow the walls to cleanup at all.  Where as the Don’t Clean Join keeps the walls joined, but doesn’t clean up the materials.  In this case, that meant the gyp board didn’t try to cap off the masonry wall.

Tuesday, January 18, 2011

Error: Not Enough Space on C Drive

Over the past few weeks, I’ve had quite a few people call or email into our support line about getting this message “Not Enough Space on Drive C:” when trying to save their project and Revit then crashing.  Everyone says that they have “a ton of space” available, so there’s no way there isn’t enough space on the C.  And besides, we’re saving to the Network!

I did a little investigating and contacted Autodesk about the message.  It turns out that the message is not quite worded correctly!  What it apparently means is that there isn’t enough Virtual Memory available to complete the task, so Revit needs to close.  So, the message is somewhat technically correct, Virtual Memory is usually on the C drive, but the message makes you think there isn’t enough actual disk space available, even though you are saving to the network.

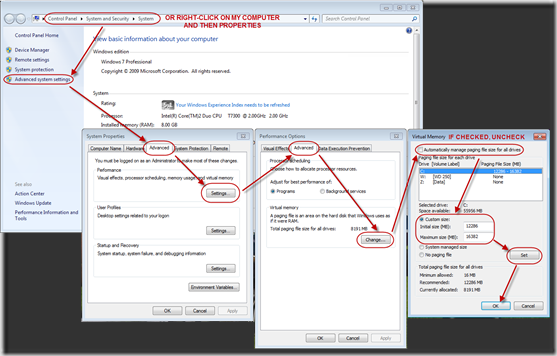
Up to this point, we’ve usually been able to limit the message from popping up by cleaning out the Windows TEMP folder, but even then it didn’t help eliminate it.  So, how do you fix it/adjust your virtual memory and what should I use for values?  First off, the value(s) for Virtual Memory according to Autodesk should be at least 1.5X the installed RAM.  So, if you have 4GB of RAM installed, the virtual memory should be at least 6GB.  Here’s a screen shot of how I get to change my Virtual Memory settings on my Window 7 x64 laptop…
SNAGHTML12dcb4f

One thing to note about this…you may need to talk to you IT person in order to change these values if anything is grayed out.  You will also need to restart your computer before these chance take affect.

As you can see in the Performance Options dialog, my virtual memory was initially set to the installed RAM (8GB of RAM = 8191 MB).  I went ahead and unchecked the “Automatically manage the paging…” in the Virtual Memory dialog, then hit the “Custom size” radio button.  I set my “Initial size (MB)” to be 1.5x my installed RAM (8191*1.5) to get the 12286.  I then set my “Maximum size (MB)” to be 2x my installed RAM (8191*2) to get the 16382.

Changing this value should alleviate the error message of not having enough space on the C drive.  Granted, if you are working on a 32bit PC, have 4GB of RAM installed, you’re Virtual Memory still may not be able to handle very large Revit projects/files.  Definitely check out the Revit  Model Performance Technical Note from Autodesk for more info on RAM and Virtual Memory.

Sunday, January 2, 2011

Happy New Year and Personal Update

For those of you who still actually follow my blog, I need to first off say Thank You! and sorry for not posting since mid Sept. (I can’t believe it’s been that long!) This past year was an interesting year…work was up and down (mostly up and busy) and I really started getting into photography The latter, is the main reason why I haven’t been posting this past fall and winter. As much as I wanted to post about Revit and BIM, photography just kept pulling me aside and taking up much more of my time during my off-work hours. In the new year though, I will be posting much, much more to this blog and my Navisworks blog…I promise!

Now, speaking of photography…I need to also share some great news. This past fall I took pictures of an area Freshman football team and had a blast. I stumbled upon a national photo contest from Canon called “Why Do You Love Football?” and decided to submit a few pictures. Much to my surprise, one of my pictures was selected as a finalist in the contest! I could not believe it. The photo below was selected as 1 of 7 finalist in the Adult Action category…

Determined

This is where I need to ask for a little favor/help. There is a public voting period that ends on January 7, 2011 and I need your help! If my photo is selected as the winner in the Adult Category, the picture will be unveiled and hung in the Pro Football Hall of Fame! Not only that, but anyone who votes is entered into a drawing to win a Canon T2i camera kit.

To vote, you can go to http://www.nfl.usa.canon.com/vote/photoContest.html When you enter the voting, you will first vote for your favorite Teen Action, then Teen Feature, then your favorite of those two. After this, you will get to the Adult Action category, this is where my picture is. You’ll then do the same as the Teen categories. The name of the picture is “Determined”. After all of your voting, you’ll need to enter your information…this is to enter your votes and yourself into the drawing for the camera.

Again, thank you for still keeping an eye on my little area of the blog-world and I look forward to bringing much more information in 2011. I hope everyone had a safe and great New Years! (And yes, thank you in advance for anyone that votes for my picture)

Dwane Lindsey

::Update on Contest - My photo finished in 2nd place in the Adult Action Category! Thank you to anyone/everyone who voted, it is very much appreciated!